Today I will show you how to use nmap to find devices on your network. Knowing which devices are available on a network is the first step to both attacking and defending your systems. It is important to identify unauthorized, or ‘rogue’, devices in order to maintain a high level of network security.
Knowing which devices are running which services is invaluable to a penetration tester as well. Identifying which hosts are available on a network is part of the reconnaissance phase of a cyber attack. If you are curious, you can learn more about the steps involved in a cyber attack.
Now that we know why we might want to locate hosts and services available on a network, how do we actually go about doing this? A network scan uses a variety of techniques to detect and fingerprint hosts on a network. We will be using the highly popular Network Mapper, or nmap. But first, what is nmap?
What is nmap?
Network Mapper (nmap) is a network scanning tool that is used to detect hosts and services on a network. Nmap can also be used to identify service versions, operating systems and much more.

Is nmap safe?
Because nmap is such a powerful tool there are a few things you should know before you install it. The software itself is safe, as in not malicious, if downloaded from the official site linked below.
You must run the tool as root to use the advanced scanning features. This poses its own risks and you should be comfortable running commands as root.
There is nothing to protect you from amateur mistakes. Nmap is not an exploit tool but a scanning tool so the damage is not as extreme. However some networks do not tolerate scanning activity very well so a simple scan might turn into a DDoS attack.
Scanning is also a very noisy activity. You will be blocked if you start scanning large swathes of the Internet. This is very noticeable, don’t do it.
Now that we have that covered, let’s get right to it!
How to Use nmap
First go ahead and download nmap for your specific operating system. The download is available on the nmap.org download page here: Download nmap.
Once you have nmap downloaded and installed we can start exploring a few of the many features available.
This article is not meant to be a comprehensive overview of all features in nmap. It is a very powerful tool with numerous options. Instead we will highlight the more common features and options of this tool so that you can begin experimenting on your own.
Bring up your command line and pick a host on your network. If you don’t know the IP of any devices on your network you can scan 127.0.0.1, the localhost address for now. We will discover more IPs to scan in a moment.
If you don’t have any interesting devices on your network you can also install Metasploitable in VirtualBox. This is a vulnerable VM designed for experimenting with penetration testing techniques.
To kick off a simple scan with the defaults just run:
nmap -sV 192.168.1.220Assuming the target system doesn’t block the scan you should see some scan results shortly.
Starting Nmap 7.91 ( https://nmap.org ) at 2021-06-26 13:15 EDT
Nmap scan report for 192.168.1.220
Host is up (0.0076s latency).
Not shown: 995 closed ports
PORT     STATE SERVICE
22/tcp   open  ssh
53/tcp   open  domain
80/tcp   open  http
111/tcp  open  rpcbind
8081/tcp open  blackice-icecap

Nmap done: 1 IP address (1 host up) scanned in 0.27 seconds
Scanning your local network
Before we explore nmap’s extensive command line options, let us scan our local network with a quick default scan. If your household is anything like mine, chances are you have a couple of smart phones, smart TVs, lights, you name it, all connected to your Wifi. Lets see if we can detect any with our scan.
Get your local network range
Before we can scan our local network, we need to determine the correct IP range to scan. Most likely your home router provides a 192.168.xx.xx type address, though various models may offer a different range such as 10.x.x.x.
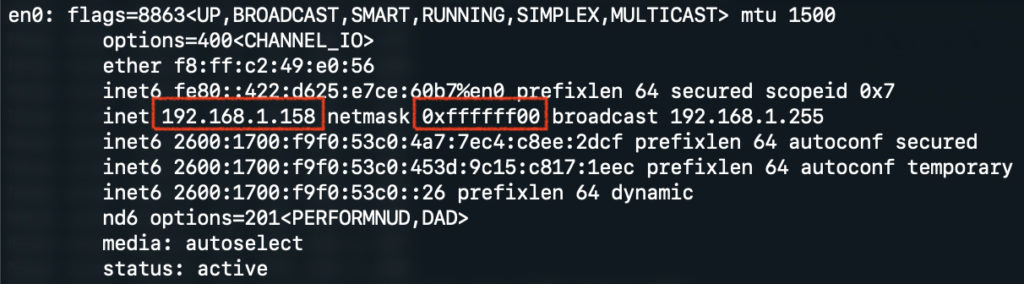
Luckily it is quite easy to determine your local network range. You can check what network your computer is using with the ifconfig command on Mac and Unix systems and with the ipconfig command on Windows. This will give you details about your network adapter, including the subnet. In the screenshot below you can see that my computer has a local IP of 192.168.1.158, and a netmask of 0xffffff00. 0xffffff00 corresponds to a /24 bit mask. Your router most likely provides the same size subnet, but if you get a different netmask value, you can use a calculator such as this subnet calculator.
Initiating a scan
Now that we have our local network range, let’s get scanning. The following command instructs nmap to scan the 192.168.1.1/24 subnet (my local network). This includes the IPs from 192.168.1.1 all the way through 192.168.1.255.
nmap -sV 192.168.1.1/24We are using the -sV flag to inform nmap to perform probes on any services it finds and attempt to determine the version of software running on that port. The following is the output after running the command on my local network. I’ve left some parts out as the output can get quite long if you have many devices on your network.
Starting Nmap 7.91 ( https://nmap.org ) at 2021-06-21 21:08 EDT
Nmap scan report for smarttv.isp.net (192.168.1.73)
Host is up (0.0051s latency).
Not shown: 995 closed ports
PORT     STATE SERVICE         VERSION
7000/tcp open  rtsp            AirTunes rtspd 377.25.06
8008/tcp open  http?
8009/tcp open  ssl/castv2      Ninja Sphere Chromecast driver
8443/tcp open  ssl/https-alt?
9000/tcp open  ssl/cslistener?

...

Nmap scan report for macbook.isp.net (192.168.1.158)
Host is up (0.00054s latency).
Not shown: 997 filtered ports
PORT     STATE SERVICE VERSION
22/tcp   open  ssh     OpenSSH 8.1 (protocol 2.0)
80/tcp   open  http    Apache httpd 2.4.41 ((Unix) PHP/7.3.11)
3306/tcp open  mysql   MySQL 8.0.19

...

Nmap scan report for 192.168.1.231
Host is up (0.029s latency).
All 1000 scanned ports on 192.168.1.231 are closed

...

Service detection performed. Please report any incorrect results at https://nmap.org/submit/ .
Nmap done: 256 IP addresses (9 hosts up) scanned in 194.20 seconds
From this output we can see a couple of devices with open ports on my local network. There is my laptop, hosting an Apache web server, and my Smart TV with all manner of ports open. You can also see what the output looks like when no open ports are detected on a host.
Now that we can initiate a basic scan of our local network, let us take a look at some command line options to further refine our scan.
Target specification
First let us take a look at how we can define our scan range more specifically.
For example, you can specify a list of hosts to scan from a file with -iL. Suppose we have a list of IP addresses in the file scan-hosts.txt:
nmap -iL scan-hosts.txt

Starting Nmap 7.91 ( https://nmap.org ) at 2021-06-21 21:17 EDT
Nmap done: 14 IP addresses (0 hosts up) scanned in 6.19 seconds
This instructs nmap to scan the list of IPs it reads from the file. In this case it was a list of old host addresses that were no longer in use.
The scanner also has the ability to generate a random list of hosts to scan. This is done by using the -iR flag, and then specifying the number of hosts to scan. Be careful with this option! This will include public IP addresses! The owners of these systems may not be too happy with you scanning them.
To use this flag simply specify the number of random hosts to scan after the -iR flag.
nmap -iR <num hosts>There is also the option to exclude specific hosts or ranges. This is particularly useful if you have a slow device that takes a long time to scan. This may also be used during a penetration test to avoid scanning a known honeypot for example.
Exclude specific hosts:
nmap --exclude <host1> <host2> ...Host discovery
The first phase of an nmap scan consists of host discovery. During this phase nmap attempts to determine if there are any online hosts within the scan range. This cuts down on the scan time significantly as nmap does not try to scan any ports unless a host is online and responsive.
List targets to scan (good for confirming scan range)
nmap -sL 192.168.1.1/24

Starting Nmap 7.91 ( https://nmap.org ) at 2021-06-21 20:41 EDT
Nmap scan report for 192.168.1.0
Nmap scan report for 192.168.1.1
Nmap scan report for 192.168.1.2
Nmap scan report for 192.168.1.3
Nmap scan report for 192.168.1.4
Nmap scan report for 192.168.1.5
Nmap scan report for 192.168.1.6
Nmap scan report for 192.168.1.7
Nmap scan report for 192.168.1.8
Nmap scan report for 192.168.1.9
Nmap scan report for 192.168.1.10

...
Ping scan – use ICMP only, don’t scan any ports
nmap -sn 192.168.1.1/24Treat all hosts as online. This is good for when hosts are not responding to ICMP but you know they are there.
nmap -Pn 192.168.1.1/24Specify whether to perform DNS resolution
Without DNS resolution
nmap -n 192.168.1.1/24 Nmap scan report for 192.168.1.73
Nmap scan report for 192.168.1.74
Nmap scan report for 192.168.1.75
Nmap scan report for 192.168.1.76
Nmap scan report for 192.168.1.77With DNS resolution (-R is on by default):
nmap -R 192.168.1.1/24 Nmap scan report for viziocastdisplay.isp.net (192.168.1.73)
Nmap scan report for 192.168.1.74
Nmap scan report for amazon-74b9e7c98.isp.net (192.168.1.75)
Nmap scan report for QCA4002.isp.net (192.168.1.76)
Nmap scan report for QCA4002.isp.net (192.168.1.77)Scan techniques
Depending on the specific target being scanned, the type of scan may need to be altered. By default for example, nmap does not perform UDP scans. If you know a specific target may be running UDP services a UDP scan would be appropriate.
The most interesting options here are the scan types, the UDP scan, and the “special scans” (-sN/sF/sX).
  -sS/sT/sA/sW/sM: TCP SYN/Connect()/ACK/Window/Maimon scans
  -sU: UDP Scan
  -sN/sF/sX: TCP Null, FIN, and Xmas scans
  --scanflags <flags>: Customize TCP scan flags
  -sI <zombie host[:probeport]>: Idle scan
  -sY/sZ: SCTP INIT/COOKIE-ECHO scans
  -sO: IP protocol scan
  -b <FTP relay host>: FTP bounce scan
Port specification
When fingerprinting a server you may already have an idea of specific ports that may be open. You can specify which ports to scan with the -p flag. You can scan a common Linux web server with the following command. This command scans ports that are commonly found on web servers: FTP port 21, SSH port 22, HTTP port 80, and HTTP proxy port 8080. The command also attempts to determine versions of the running services.
nmap -p21,22,80,8080 -sV 192.168.1.220

Starting Nmap 7.91 ( https://nmap.org ) at 2021-06-21 21:00 EDT
Nmap scan report for 192.168.1.220
Host is up (0.0072s latency).

PORT     STATE  SERVICE    VERSION
21/tcp   closed ftp
22/tcp   open   ssh        OpenSSH 8.2p1 Ubuntu 4ubuntu0.2 (Ubuntu Linux; protocol 2.0)
80/tcp   open   http       Apache httpd 2.4.41 ((Ubuntu))
8080/tcp closed http-proxy
Service Info: OS: Linux; CPE: cpe:/o:linux:linux_kernel

Service detection performed. Please report any incorrect results at https://nmap.org/submit/ .
Nmap done: 1 IP address (1 host up) scanned in 6.43 seconds
You can also exclude specific ports from a general scan. For example to skip scanning port 80 use:
nmap --exclude-ports 80 192.168.1.220

Starting Nmap 7.91 ( https://nmap.org ) at 2021-06-21 21:03 EDT
Nmap scan report for 192.168.1.220
Host is up (0.0098s latency).
Not shown: 996 closed ports
PORT     STATE SERVICE
22/tcp   open  ssh
53/tcp   open  domain
111/tcp  open  rpcbind
8081/tcp open  blackice-icecap

Nmap done: 1 IP address (1 host up) scanned in 0.26 seconds
Service and version detection
Of course determining if a port is open is all good and well, ideally we want to find vulnerable services. To do this we need to figure out what versions of services are running on each port. Nmap can do this for us with the -sV flag.
nmap -sV 192.168.1.220

Starting Nmap 7.91 ( https://nmap.org ) at 2021-06-21 21:05 EDT
Nmap scan report for 192.168.1.220
Host is up (0.0084s latency).
Not shown: 995 closed ports
PORT     STATE SERVICE VERSION
22/tcp   open  ssh     OpenSSH 8.2p1 Ubuntu 4ubuntu0.2 (Ubuntu Linux; protocol 2.0)
53/tcp   open  domain  dnsmasq 2.80
80/tcp   open  http    Apache httpd 2.4.41 ((Ubuntu))
111/tcp  open  rpcbind 2-4 (RPC #100000)
8081/tcp open  http    nginx
Service Info: OS: Linux; CPE: cpe:/o:linux:linux_kernel

Service detection performed. Please report any incorrect results at https://nmap.org/submit/ .
Nmap done: 1 IP address (1 host up) scanned in 7.06 seconds
As you can see, we get a bit more information about each port now. For example we can see that this server is running Apache 2.4.41. Armed with this information we could now search for vulnerabilities in that version of Apache.
OS detection
Just as we want to know the versions of each service running on the system, we also would like to know the specific OS version running on the system.
Note, this option requires root privileges. To enable OS fingerprinting:
sudo nmap -O 192.168.1.220

Starting Nmap 7.91 ( https://nmap.org ) at 2021-06-21 21:10 EDT
Nmap scan report for 192.168.1.220
Host is up (0.0064s latency).
Not shown: 995 closed ports
PORT     STATE SERVICE
22/tcp   open  ssh
53/tcp   open  domain
80/tcp   open  http
111/tcp  open  rpcbind
8081/tcp open  blackice-icecap
MAC Address: C8:58:C0:10:BF:17 (Intel Corporate)
Device type: general purpose
Running: Linux 4.X|5.X
OS CPE: cpe:/o:linux:linux_kernel:4 cpe:/o:linux:linux_kernel:5
OS details: Linux 4.15 - 5.6
Network Distance: 1 hop

OS detection performed. Please report any incorrect results at https://nmap.org/submit/ .
Nmap done: 1 IP address (1 host up) scanned in 2.06 seconds
Unfortunately nmap could not determine the flavor of linux running on the system, but we do have some linux kernel information now.
Evasion and spoofing
Many IDS systems will detect, and often prevent, port scans as they are highly noticeable. This section outlines some of the more common options for cloaking a scan. IDS evasion is a complex topic in itself and is out of the scope of this post.
Scan slower
By default nmap tries to complete a scan as quickly as possible without overloading the target system. This is great for experimenting as you want to see your results quickly. However scanning a “target” system at full speed is a sure fire way to get blocked and cut your testing short.
Here are two scans at the slowest and fastest speeds for comparison. Any value between 0 and 5 is valid for the -T parameter.
Scan at highest speed:
nmap -T5 192.168.1.220

Starting Nmap 7.91 ( https://nmap.org ) at 2021-06-21 21:27 EDT
Nmap scan report for 192.168.1.220
Host is up (0.017s latency).
Not shown: 995 closed ports
PORT     STATE SERVICE
22/tcp   open  ssh
53/tcp   open  domain
80/tcp   open  http
111/tcp  open  rpcbind
8081/tcp open  blackice-icecap

Nmap done: 1 IP address (1 host up) scanned in 1.32 seconds
Scan at lowest speed. Scanning at the lowest speed though less noticeable is considerably slower! The same scan was run with -T0. I left this scan running overnight and you can see it took 11 hours to complete.
nmap -T0 192.168.1.220

Starting Nmap 7.91 ( https://nmap.org ) at 2021-06-21 21:27 EDT
Nmap scan report for 192.168.1.220
Host is up (0.017s latency).
Not shown: 995 closed ports
PORT     STATE SERVICE
22/tcp   open  ssh
53/tcp   open  domain
80/tcp   open  http
111/tcp  open  rpcbind
8081/tcp open  blackice-icecap

Nmap done: 1 IP address (1 host up) scanned in 11:18:39
Nmap output formats
Running nmap in a terminal is good fun, but ideally we would like to make use of the data that nmap provides for deeper analysis or exploitation. Other security tools for example may accept a XML file for host specification.
Lucky for us, nmap has a number of different output formats depending on how the information is to be consumed.
-oN <file>: Output scan in normal (default)
-oX <file>: XML,
-oS <file>: s|<rIpt kIddi3,
-oG <file>: and Grepable format, respectively, to the given filename.
The Grepable format (-oG) is perfect for further parsing on the command line or in a script. Here we instruct nmap to print output in a Grepable format to stout –.
greg@securing.ninja[~]$ nmap -n -sV -oG - 192.168.1.220
# Nmap 7.91 scan initiated Mon Jun 21 17:37:33 2021 as: nmap -n -sV -oG - 192.168.1.220
Host: 192.168.1.220 ()	Status: Up
Host: 192.168.1.220 ()	Ports: 22/open/tcp//ssh//OpenSSH 8.2p1 Ubuntu 4ubuntu0.2 (Ubuntu Linux; protocol 2.0)/, 53/open/tcp//domain//dnsmasq 2.80/, 80/open/tcp//http//Apache httpd 2.4.41 ((Ubuntu))/, 111/open/tcp//rpcbind//2-4 (RPC #100000)/, 8081/open/tcp//http//nginx/	Ignored State: closed (995)
# Nmap done at Mon Jun 21 17:37:40 2021 -- 1 IP address (1 host up) scanned in 7.52 seconds
Putting it all together
In general, nmap is very easy to use and an effective method for discovering hosts and services on a network.
Security professionals and hobbyists alike use nmap everyday because of its powerful features. Of course we have just scratched the surface with this post but we hope you now have the skills to start scanning systems with nmap. Take some time to read more about some of the other options and flags. There is lots more to discover making nmap such a powerful tool.